
Hub Python Library documentation
추론 엔드포인트
추론 엔드포인트
Inference Endpoints는 Hugging Face가 관리하는 전용 및 오토스케일링 인프라에 transformers, sentence-transformers, diffusers 모델을 쉽게 배포할 수 있는 안전한 프로덕션 솔루션을 제공합니다. Inference Endpoint는 Hub의 모델로 구성됩니다.
이 가이드에서는 huggingface_hub를 사용하여 Inference Endpoints를 프로그래매틱으로 관리하는 방법을 배웁니다. Inference Endpoints 제품 자체에 대한 자세한 내용은 공식 문서를 참고하세요.
이 가이드는 huggingface_hub이 올바르게 설치되어 있고 머신에 로그인되어 있다고 가정합니다. 아직 해당 상태가 아니라면 Quick Start 가이드를 확인하세요. Inference Endpoints API를 지원하는 최소 버전은 v0.19.0입니다.
신규: 이제 HF 모델 카탈로그에서 간단한 API 호출로 Inference Endpoint를 배포할 수 있습니다. 카탈로그는 최적화된 설정으로 배포할 수 있는 모델의 정성스럽게 선별된 목록입니다. 아무것도 설정할 필요가 없으며, 모든 복잡한 처리를 우리가 담당합니다. 모든 모델과 설정은 최적의 비용/성능 균형을 제공하도록 테스트가 완료된 것이 보장됩니다. create_inference_endpoint_from_catalog()는 create_inference_endpoint()와 동일하게 작동하지만, 전달해야 할 파라미터가 훨씬 적습니다. list_inference_catalog()를 사용하면 카탈로그를 프로그래매틱으로 가져올 수 있습니다.
이것은 여전히 실험적인 기능임을 유의하세요. 사용하시게 되면 의견을 알려주세요!
각 카탈로그 모델은 레시피를 통해 배포됩니다. 레시피는 해당 모델에 대해 테스트가 완료된 하드웨어와 엔진의 조합입니다. list_inference_catalog()는 모델과 해당 레시피를 반환하며, 서버 측 필터(accelerator, engine, license, task, search, limit)를 받습니다:
>>> from huggingface_hub import list_inference_catalog
>>> catalog = list_inference_catalog(task="text-generation", accelerator="neuron")
>>> catalog[0]
InferenceCatalogModel(repo_id='meta-llama/Llama-3.1-8B-Instruct', name='Llama-3.1-8B-Instruct', ...)
>>> catalog[0].recipes
[InferenceCatalogRecipe(id='sizzling-biryani-g4xsi1ac', accelerator='gpu', engine='vllm', gguf_file=None, revision=None),
InferenceCatalogRecipe(id='artisanal-quinoa-yz9ynamx', accelerator='neuron', engine='vllmNeuron', gguf_file=None, revision=None)]repo_id를 create_inference_endpoint_from_catalog()에 전달하여 모델의 기본 레시피를 배포하고, accelerator("cpu", "gpu" 또는 "neuron")와 gguf_file로 선택적으로 범위를 좁힐 수 있습니다. 또는 recipe_id를 전달하여 정확한 레시피를 배포할 수 있습니다:
>>> from huggingface_hub import create_inference_endpoint_from_catalog
>>> endpoint = create_inference_endpoint_from_catalog(repo_id="openai/gpt-oss-120b")
>>> endpoint = create_inference_endpoint_from_catalog(recipe_id="artisanal-quinoa-yz9ynamx")
배포할 하드웨어 찾기
create_inference_endpoint()에서 허용하는 accelerator, vendor, region, instance_type, instance_size 값은 서로 의존합니다. list_inference_endpoints_hardware()를 사용하여 유효한 조합, 시간당 가격, 네임스페이스의 accelerator 할당량을 나열하세요:
>>> from huggingface_hub import list_inference_endpoints_hardware

>>> for hw in list_inference_endpoints_hardware():
...     if hw.accelerator == "gpu" and hw.status == "available":
...         print(hw.vendor, hw.region, hw.instance_type, hw.instance_size, hw.price_per_hour)
aws us-east-1 nvidia-l4 x1 0.8
aws us-east-1 nvidia-l4 x4 3.8
...
Quota는 namespace별로 적용되므로, 배포할 namespace를 전달하세요(기본값은 사용자 계정입니다):
>>> list_inference_endpoints_hardware(namespace="my-org")또는 CLI를 통해:
hf endpoints hardware --accelerator gpu
Inference Endpoint 생성
첫 단계는 create_inference_endpoint()를 사용하여 Inference Endpoint를 만드는 것입니다:
>>> from huggingface_hub import create_inference_endpoint

>>> endpoint = create_inference_endpoint(
...     "my-endpoint-name",
...     repository="gpt2",
...     framework="pytorch",
...     task="text-generation",
...     accelerator="cpu",
...     vendor="aws",
...     region="us-east-1",
...     type="authenticated",
...     instance_size="x2",
...     instance_type="intel-icl"
... )
또는 CLI를 통해:
hf endpoints deploy my-endpoint-name --repo gpt2 --framework pytorch --accelerator cpu --vendor aws --region us-east-1 --instance-size x2 --instance-type intel-icl --task text-generation

# Deploy from the catalog with a single command
hf endpoints catalog deploy --repo openai/gpt-oss-120b

# Deploy from the catalog with a specific accelerator
hf endpoints catalog deploy --repo openai/gpt-oss-120b --accelerator gpu

# Deploy an exact catalog recipe, as listed by 'hf endpoints catalog ls'
hf endpoints catalog deploy --recipe artisanal-quinoa-yz9ynamx
이 예시에서는 text-generation을 위해 gpt2를 서빙하기 위해 authenticated Inference Endpoint를 "my-endpoint-name"이라는 이름으로 생성했습니다. authenticated Inference Endpoint는 API 접근에 토큰이 필요함을 의미합니다. 또한 벤더, 리전, 가속기, 인스턴스 유형, 크기 등 하드웨어 요구 사항을 구성하기 위한 추가 정보를 제공해야 합니다. 사용 가능한 리소스 목록은 여기에서 확인할 수 있습니다. 또는 편의를 위해 Web interface를 사용하여 Inference Endpoint를 수동으로 생성할 수도 있습니다. 고급 설정 및 사용법에 대한 자세한 내용은 이 가이드를 참고하세요.
create_inference_endpoint()이 반환하는 값은 InferenceEndpoint 객체입니다:
>>> endpoint
InferenceEndpoint(name='my-endpoint-name', namespace='Wauplin', repository='gpt2', status='pending', url=None)
또는 CLI를 통해:
hf endpoints describe my-endpoint-name
엔드포인트에 대한 정보를 담고 있는 dataclass입니다. name, repository, status, task, created_at, updated_at와 같은 중요한 속성에 접근할 수 있습니다. 필요할 경우 endpoint.raw를 통해 서버의 원시 응답에도 접근할 수 있습니다.
Inference Endpoint가 생성되면 개인 대시보드에서 확인할 수 있습니다.
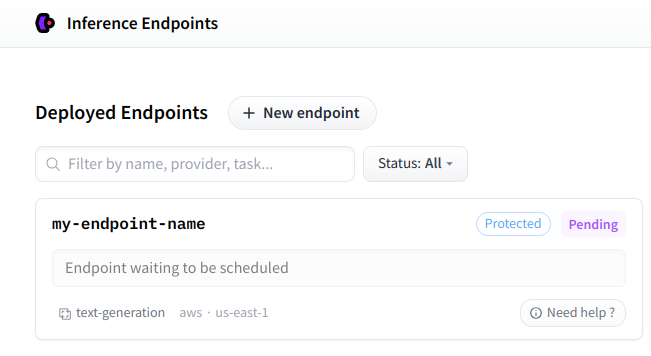
사용자 지정 이미지 사용
기본적으로 Inference Endpoint는 Hugging Face에서 제공하는 docker 이미지로 구축됩니다. 그러나 custom_image 매개변수를 사용하여 임의의 docker 이미지를 지정할 수 있습니다. 일반적인 사용 사례는 text-generation-inference 프레임워크를 사용하여 LLM을 실행하는 것입니다. 다음과 같이 수행할 수 있습니다:
# Start an Inference Endpoint running Zephyr-7b-beta on TGI
>>> from huggingface_hub import create_inference_endpoint
>>> endpoint = create_inference_endpoint(
...     "aws-zephyr-7b-beta-0486",
...     repository="HuggingFaceH4/zephyr-7b-beta",
...     framework="pytorch",
...     task="text-generation",
...     accelerator="gpu",
...     vendor="aws",
...     region="us-east-1",
...     type="authenticated",
...     instance_size="x1",
...     instance_type="nvidia-a10g",
...     custom_image={
...         "healthRoute": "/health",
...         "env": {
...             "MAX_BATCH_PREFILL_TOKENS": "2048",
...             "MAX_INPUT_LENGTH": "1024",
...             "MAX_TOTAL_TOKENS": "1512",
...             "MODEL_ID": "/repository"
...         },
...         "url": "ghcr.io/huggingface/text-generation-inference:1.1.0",
...     },
... )custom_image로 전달할 값은 docker 컨테이너의 url과 실행 설정을 포함하는 사전입니다. 자세한 내용은 Swagger 문서를 참고하세요.
개인 컨테이너 레지스트리에 호스팅된 이미지의 경우, container_registry_username를 전달하고, 레지스트리가 요구하는 경우 container_registry_password도 전달합니다. 자격 증명은 일반 커스텀 컨테이너에서만 지원됩니다:
>>> endpoint = create_inference_endpoint(
...     # Other endpoint and hardware arguments omitted for brevity.
...     custom_image={"url": "private.registry.example/my-image:latest", "port": 8080},
...     container_registry_username="user",
...     container_registry_password="password",
... )
해당 CLI 옵션은 --container-registry-username과 --container-registry-password입니다:
hf endpoints deploy my-endpoint ... --custom-image private.registry.example/my-image:latest \
  --container-registry-username user --container-registry-password password
custom_image는 API가 지원하는 엔진별 컨테이너 유형도 인수로 받을 수 있으며, 이 경우 평탄한 구조 대신 엔진 이름(vLLM, vLLMNeuron, sGLang, tgi, tgiNeuron, tei, llamacpp, hfServe, …)을 딕셔너리의 키로 사용합니다. 각 엔진은 일반적인 컨테이너 필드(url, port, healthRoute) 외에 자체 튜닝 옵션을 포함합니다. 최상위 url이 없는 딕셔너리는 그대로 API로 전달되므로, 나중에 API에 추가되는 엔진도 huggingface_hub을 업그레이드하지 않고 사용할 수 있습니다:
# Start an Inference Endpoint running the vLLM engine image
>>> endpoint = create_inference_endpoint(
...     "llama-3-1-8b-instruct-vllm",
...     repository="meta-llama/Llama-3.1-8B-Instruct",
...     framework="pytorch",
...     task="text-generation",
...     accelerator="gpu",
...     vendor="aws",
...     region="us-east-1",
...     instance_size="x1",
...     instance_type="nvidia-l4",
...     custom_image={
...         "vLLM": {
...             "url": "vllm/vllm-openai:v0.23.0",
...             "healthRoute": "/health",
...             "port": 8000,
...             "tensorParallelSize": 1,
...         }
...     },
... )
engine 키가 없으면 동일한 사전이 일반 커스텀 컨테이너로 전송되므로, 엔진별 옵션(여기서는 tensorParallelSize)이 제거됩니다.
커스텀 entrypoint 또는 런타임 플래그가 필요한 컨테이너의 경우, container_command 및/또는 container_args(각각 토큰 목록)를 전달합니다. 이들은 API 페이로드의 model.command 및 model.args에 매핑됩니다. 커스텀 이미지와 연결되어 있지 않습니다. 관리형 엔진 이미지(예: vLLM, SGLang)도 container_args를 통해 엔진 플래그를 받을 수 있습니다. CLI에서도 hf endpoints deploy ... --container-command "..." --container-args "..."를 통해 동일한 기능을 사용할 수 있습니다.
멀티 가속기 인스턴스에서 병렬성
vLLM과 SGLang은 기본적으로 가속기 1개를 사용하는 반면, 엔드포인트는 인스턴스의 모든 가속기가 할당되므로, 병렬성을 설정하지 않으면 모델이 가속기 1개에 로드되고 나머지는 유휴 상태가 되면서도 여전히 정상으로 보고됩니다. 이로 인해 모든 가속기의 비용을 지불하면서 단 1개 가속기의 처리량만 얻게 됩니다. 이러한 배포를 API가 거부하는 이유입니다. (TGI는 인스턴스에서 샤드 수를 유도하므로 영향을 받지 않습니다.) tensorParallelSize를 설정하여 모델 복사본 1개를 가속기에 걸쳐 샤딩하거나, dataParallelSize(vLLM 전용)을 설정하여 가속기당 복사본 1개를 실행하세요:
>>> endpoint = create_inference_endpoint(
...     "gpt-oss-120b-vllm",
...     repository="openai/gpt-oss-120b",
...     framework="custom",
...     accelerator="gpu",
...     instance_size="x8",
...     instance_type="nvidia-h200",
...     region="us-east-1",
...     vendor="aws",
...     custom_image={"vLLM": {"url": "vllm/vllm-openai:v0.23.0", "tensorParallelSize": 8}},
... )
CLI에서 --engine은 관리되는 엔진 이미지를 선택하며, 두 플래그는 해당 이미지의 설정에 기록됩니다:
hf endpoints deploy gpt-oss-120b-vllm --repo openai/gpt-oss-120b --framework custom \
  --accelerator gpu --instance-size x8 --instance-type nvidia-h200 --region us-east-1 --vendor aws \
  --engine vllm --custom-image vllm/vllm-openai:v0.23.0 --tensor-parallel-size 8
배포된 엔드포인트를 다시 조정하려면 tensor_parallel_size만 update() 또는 hf endpoints update에 전달하세요. model.image는 전체로 전송되며 url이 필요하므로, 엔드포인트의 현재 이미지가 가져와져 제자리에서 업데이트됩니다:
>>> endpoint.update(tensor_parallel_size=4)container_args (--tp 8)는 동등하지 않습니다. 이는 model.image 설정이 인스턴스의 가속기 수와 대조하여 검증하는 대상이 아니라, 엔진으로 커맨드라인 플래그로 전달됩니다. 이미지 필드가 없는 엔진 플래그와, 병렬성 필드가 없는 일반 커스텀 컨테이너에 사용하세요.
기존 Inference Endpoints 가져오기 또는 목록 보기
일부 경우 이전에 생성한 Inference Endpoints를 관리해야 할 수 있습니다. 이름을 알고 있다면 get_inference_endpoint()를 사용하여 가져올 수 있으며, 이 메서드는 InferenceEndpoint 객체를 반환합니다. 또는 list_inference_endpoints()를 사용하여 모든 Inference Endpoints의 목록을 가져올 수 있습니다. 두 메서드 모두 선택적인 namespace 매개변수를 받습니다. namespace를 사용자가 속해 있는 조직 중 하나로 설정할 수 있습니다. 그렇지 않으면 기본값으로 사용자 이름이 사용됩니다.
>>> from huggingface_hub import get_inference_endpoint, list_inference_endpoints

# Get one
>>> get_inference_endpoint("my-endpoint-name")
InferenceEndpoint(name='my-endpoint-name', namespace='Wauplin', repository='gpt2', status='pending', url=None)

# List all endpoints from an organization
>>> list_inference_endpoints(namespace="huggingface")
[InferenceEndpoint(name='aws-starchat-beta', namespace='huggingface', repository='HuggingFaceH4/starchat-beta', status='paused', url=None), ...]

# List all endpoints from all organizations the user belongs to
>>> list_inference_endpoints(namespace="*")
[InferenceEndpoint(name='aws-starchat-beta', namespace='huggingface', repository='HuggingFaceH4/starchat-beta', status='paused', url=None), ...]
또는 CLI를 통해:
hf endpoints describe my-endpoint-name
hf endpoints ls --namespace huggingface
hf endpoints ls --namespace '*'
배포 상태 확인
이 가이드의 나머지 부분에서는 endpoint라는 이름의 InferenceEndpoint 객체가 있다고 가정합니다. 엔드포인트에 InferenceEndpointStatus 타입의 status 속성이 있다는 것을 눈치채셨을 수 있습니다. Inference Endpoint가 배포되어 접근 가능할 때, status는 "running"이어야 하며 url 속성이 설정됩니다:
>>> endpoint
InferenceEndpoint(name='my-endpoint-name', namespace='Wauplin', repository='gpt2', status='running', url='https://jpj7k2q4j805b727.us-east-1.aws.endpoints.huggingface.cloud')
"running" 상태에 도달하기 전에 Inference Endpoint는 일반적으로 "initializing" 또는 "pending" 단계를 거칩니다. fetch()를 실행하여 엔드포인트의 새로운 상태를 가져올 수 있습니다. 서버에 요청을 보내는 InferenceEndpoint의 모든 다른 메서드와 마찬가지로, endpoint의 내부 속성은 제자리에서 변경됩니다:
>>> endpoint.fetch()
InferenceEndpoint(name='my-endpoint-name', namespace='Wauplin', repository='gpt2', status='pending', url=None)
또는 CLI를 통해:
hf endpoints describe my-endpoint-name
Inference Endpoint가 실행될 때까지 상태를 가져오는 대신 wait()를 직접 호출할 수 있습니다. 이 헬퍼는 timeout과 fetch_every 매개변수(초 단위)를 입력으로 받아 Inference Endpoint가 배포될 때까지 스레드를 차단합니다. 기본값은 각각 None(타임아웃 없음)과 5초입니다.
# Pending endpoint
>>> endpoint
InferenceEndpoint(name='my-endpoint-name', namespace='Wauplin', repository='gpt2', status='pending', url=None)

# Wait 10s => raises a InferenceEndpointTimeoutError
>>> endpoint.wait(timeout=10)
    raise InferenceEndpointTimeoutError("Timeout while waiting for Inference Endpoint to be deployed.")
huggingface_hub._inference_endpoints.InferenceEndpointTimeoutError: Timeout while waiting for Inference Endpoint to be deployed.

# Wait more
>>> endpoint.wait()
InferenceEndpoint(name='my-endpoint-name', namespace='Wauplin', repository='gpt2', status='running', url='https://jpj7k2q4j805b727.us-east-1.aws.endpoints.huggingface.cloud')timeout이 설정되어 있고 Inference Endpoint의 로딩에 시간이 너무 오래 걸리면 InferenceEndpointTimeoutError 타임아웃 오류가 발생합니다.
추론 실행
Inference Endpoint가 설정되고 실행되면 이제 해당 엔드포인트에서 추론을 실행할 수 있습니다!
InferenceEndpoint에는 client와 async_client라는 두 가지 속성이 있으며, 각각 InferenceClient 객체와 AsyncInferenceClient 객체를 반환합니다.
# Run text_generation task:
>>> endpoint.client.text_generation("I am")
' not a fan of the idea of a "big-budget" movie. I think it\'s a'

# Or in an asyncio context:
>>> await endpoint.async_client.text_generation("I am")
Inference Endpoint가 실행 중이지 않으면 InferenceEndpointError 예외가 발생합니다:
>>> endpoint.client
huggingface_hub._inference_endpoints.InferenceEndpointError: Cannot create a client for this Inference Endpoint as it is not yet deployed. Please wait for the Inference Endpoint to be deployed using `endpoint.wait()` and try again.
InferenceClient 사용법에 대한 자세한 내용은 Inference 가이드를 참고하세요.
라이프사이클 관리
Inference Endpoint를 생성하고 해당 엔드포인트에서 추론을 실행하는 방법을 확인했으니, 이제 라이프사이클을 관리하는 방법을 살펴보겠습니다.
이 섹션에서는 pause(), resume(), scale_to_zero(), update(), delete()와 같은 메서드를 살펴봅니다. 이러한 모든 메서드는 편의를 위해 InferenceEndpoint에 추가된 별칭입니다. 원하시는 경우,
HfApi에 정의된 일반 메서드인 pause_inference_endpoint(), resume_inference_endpoint(), scale_to_zero_inference_endpoint(), update_inference_endpoint(), delete_inference_endpoint()를 사용할 수도 있습니다.
일시 중지 또는 0으로 스케일링
To reduce costs when your Inference Endpoint is not in use, you can choose to either pause it using pause() or scale it to zero using scale_to_zero().
일시 중지 또는 제로 스케일링된 Inference Endpoint는 비용이 발생하지 않습니다. 두 상태의 차이는 일시 중지된 엔드포인트는 resume()을 사용하여 명시적으로 재개해야 한다는 점입니다. 반면, 제로 스케일링된 엔드포인트에는 추론 호출이 발생하면 추가적인 콜드 스타트 지연을 수반하여 자동으로 시작됩니다. Inference Endpoint는 특정 기간 동안 비활성 상태가 되면 자동으로 제로 스케일링되도록 구성할 수도 있습니다.
# Pause and resume endpoint
>>> endpoint.pause()
InferenceEndpoint(name='my-endpoint-name', namespace='Wauplin', repository='gpt2', status='paused', url=None)
>>> endpoint.resume()
InferenceEndpoint(name='my-endpoint-name', namespace='Wauplin', repository='gpt2', status='pending', url=None)
>>> endpoint.wait().client.text_generation(...)
...

# Scale to zero
>>> endpoint.scale_to_zero()
InferenceEndpoint(name='my-endpoint-name', namespace='Wauplin', repository='gpt2', status='scaledToZero', url='https://jpj7k2q4j805b727.us-east-1.aws.endpoints.huggingface.cloud')
# Endpoint is not 'running' but still has a URL and will restart on first call.
또는 CLI를 통해:
hf endpoints pause my-endpoint-name
hf endpoints resume my-endpoint-name
hf endpoints scale-to-zero my-endpoint-name
모델 또는 하드웨어 요구 사항 업데이트
일부 경우에는 새로운 Inference Endpoint를 생성하지 않고 기존 Inference Endpoint를 업데이트하고 싶을 수 있습니다. 호스팅된 모델 또는 모델을 실행하기 위한 하드웨어 요구 사항을 업데이트할 수 있습니다. update()를 사용하여 이를 수행할 수 있습니다:
# Change target model
>>> endpoint.update(repository="gpt2-large")
InferenceEndpoint(name='my-endpoint-name', namespace='Wauplin', repository='gpt2-large', status='pending', url=None)

# Update number of replicas
>>> endpoint.update(min_replica=2, max_replica=6)
InferenceEndpoint(name='my-endpoint-name', namespace='Wauplin', repository='gpt2-large', status='pending', url=None)

# Update to larger instance
>>> endpoint.update(accelerator="cpu", instance_size="x4", instance_type="intel-icl")
InferenceEndpoint(name='my-endpoint-name', namespace='Wauplin', repository='gpt2-large', status='pending', url=None)

# Update the container arguments, e.g. engine flags on an endpoint running vLLM or SGLang.
# Replaces the current value, it is not appended.
>>> endpoint.update(container_args=["--enable-auto-tool-choice", "--tool-call-parser", "lfm2"])
InferenceEndpoint(name='my-endpoint-name', namespace='Wauplin', repository='gpt2-large', status='pending', url=None)
또는 CLI를 통해:
hf endpoints update my-endpoint-name --repo gpt2-large
hf endpoints update my-endpoint-name --min-replica 2 --max-replica 6
hf endpoints update my-endpoint-name --accelerator cpu --instance-size x4 --instance-type intel-icl
hf endpoints update my-endpoint-name --container-args "--enable-auto-tool-choice --tool-call-parser lfm2"
# Merged into the image currently configured on the endpoint.
hf endpoints update my-endpoint-name --tensor-parallel-size 8
# Or replace the image entirely, in which case pass back the settings you want to keep.
hf endpoints update my-endpoint-name --engine vllm --custom-image vllm/vllm-openai:v0.23.0 --port 8000
엔드포인트 삭제
마지막으로 더 이상 Inference Endpoint를 사용하지 않으려면 ~InferenceEndpoint.delete()를 호출하면 됩니다.
이 작업은 되돌릴 수 없으며, 구성, 로그 및 사용량 메트릭을 포함하여 엔드포인트를 완전히 삭제합니다. 삭제된 Inference Endpoint는 복원할 수 없습니다.
끝에서 끝까지 예시
Inference Endpoints의 일반적인 사용 사례는 인프라 비용을 제한하기 위해 작업 배치(batch)를 한 번에 처리하는 것입니다. 이 가이드에서 살펴본 내용을 사용하여 이 프로세스를 자동화할 수 있습니다:
>>> import asyncio
>>> from huggingface_hub import create_inference_endpoint

# Start endpoint + wait until initialized
>>> endpoint = create_inference_endpoint(name="batch-endpoint",...).wait()

# Run inference
>>> client = endpoint.client
>>> results = [client.text_generation(...) for job in jobs]

# Or with asyncio
>>> async_client = endpoint.async_client
>>> results = await asyncio.gather(*[async_client.text_generation(...) for job in jobs])

# Pause endpoint
>>> endpoint.pause()
또는 Inference Endpoint가 이미 존재하고 일시 중지된 경우:
>>> import asyncio
>>> from huggingface_hub import get_inference_endpoint

# Get endpoint + wait until initialized
>>> endpoint = get_inference_endpoint("batch-endpoint").resume().wait()

# Run inference
>>> async_client = endpoint.async_client
>>> results = await asyncio.gather(*[async_client.text_generation(...) for job in jobs])

# Pause endpoint
>>> endpoint.pause()