
Transformers documentation
实例分割
实例分割
实例分割是一种计算机视觉任务,旨在检测图像中的对象,并在像素级别对每个对象进行分割。与目标检测(输出边界框)不同,实例分割会为每个检测到的对象生成精确的掩码,即使对象相互重叠,也能区分出各个独立的实例。
在本指南中,您将学习如何:
- 从 Hugging Face Hub 加载一个实例分割数据集。
- 使用 Transformers 的 Trainer 对基于 Transformer 的实例分割模型 RF-DETR-Seg 进行微调。
- 使用平均 IoU 评估您的模型。
- 运行推理并可视化预测结果。
我们将使用 satellite-building-segmentation 数据集,该数据集包含约 9.6k 张带有建筑物实例掩码标注的卫星图像。
要查看与此任务兼容的所有架构和检查点,我们建议查阅任务页面。
在开始之前,请安装所有必要的库:
pip install -Uq "transformers>=5.9" datasets torchvision我们鼓励您与社区分享您的模型。训练完成后,请登录您的 Hugging Face 账户,将其上传到 Hub:
>>> from huggingface_hub import notebook_login

>>> notebook_login()
加载数据集
satellite-building-segmentation 数据集采用 Hugging Face Datasets 的原生格式,因此可以直接使用 load_dataset 加载。每一行包含:
image:卫星图像(PIL)image_id:图像的唯一标识符width/height:图像尺寸objects:一个字典,包含每个实例的标注,包括id、category、bbox、area、segmentation(多边形坐标)和iscrowd
>>> from datasets import load_dataset

>>> MODEL_ID = "Roboflow/rf-detr-seg-medium"
>>> DATASET_ID = "merve/satellite-building-segmentation"

>>> ds = load_dataset(DATASET_ID)
>>> train_ds = ds["train"]
>>> valid_ds = ds["validation"]
>>> print(f"Train: {len(train_ds)} images, Valid: {len(valid_ds)} images")
Train: 6764 images, Valid: 1934 images
检查单个示例。每条记录包含一个 image、一个 image_id,以及一个包含逐实例注释的 objects 字典。每个实例都有一个 bbox,格式为 [x, y, width, height],以及一个包含多边形坐标的 segmentation 字段:
>>> sample = train_ds[0]
>>> print(f"Image ID: {sample['image_id']}")
Image ID: 0
>>> print(f"Image size: {sample['image'].size}")
Image size: (512, 512)
>>> print(f"Number of instances: {len(sample['objects']['id'])}")
Number of instances: 7
>>> print(f"\nObjects keys: {list(sample['objects'].keys())}")
<BLANKLINE>
Objects keys: ['id', 'area', 'bbox', 'segmentation', 'category', 'iscrowd']
>>> print(f"First bbox: {sample['objects']['bbox'][0]}")
First bbox: [80.0, 0.0, 51.0, 51.5]
>>> print(f"First category: {sample['objects']['category'][0]}")
First category: 0
可视化一个示例及其真实掩码:
>>> import numpy as np
>>> import matplotlib.pyplot as plt
>>> from PIL import Image, ImageDraw

>>> sample = train_ds[0]
>>> image = sample["image"].convert("RGB")

>>> fig, axes = plt.subplots(1, 2, figsize=(14, 6))
>>> _ = axes[0].imshow(image)
>>> _ = axes[0].set_title("Original image")
>>> _ = axes[0].axis("off")

>>> overlay = image.copy()
>>> draw = ImageDraw.Draw(overlay, "RGBA")
>>> objects = sample["objects"]
>>> for seg in objects["segmentation"]:
...     for poly in seg:
...         coords = list(zip(poly[0::2], poly[1::2]))
...         color = tuple(np.random.randint(50, 255, 3)) + (100,)
...         draw.polygon(coords, fill=color, outline="red")

>>> _ = axes[1].imshow(overlay)
>>> _ = axes[1].set_title(f"Ground truth ({len(objects['id'])} buildings)")
>>> _ = axes[1].axis("off")
>>> plt.tight_layout()
>>> plt.show()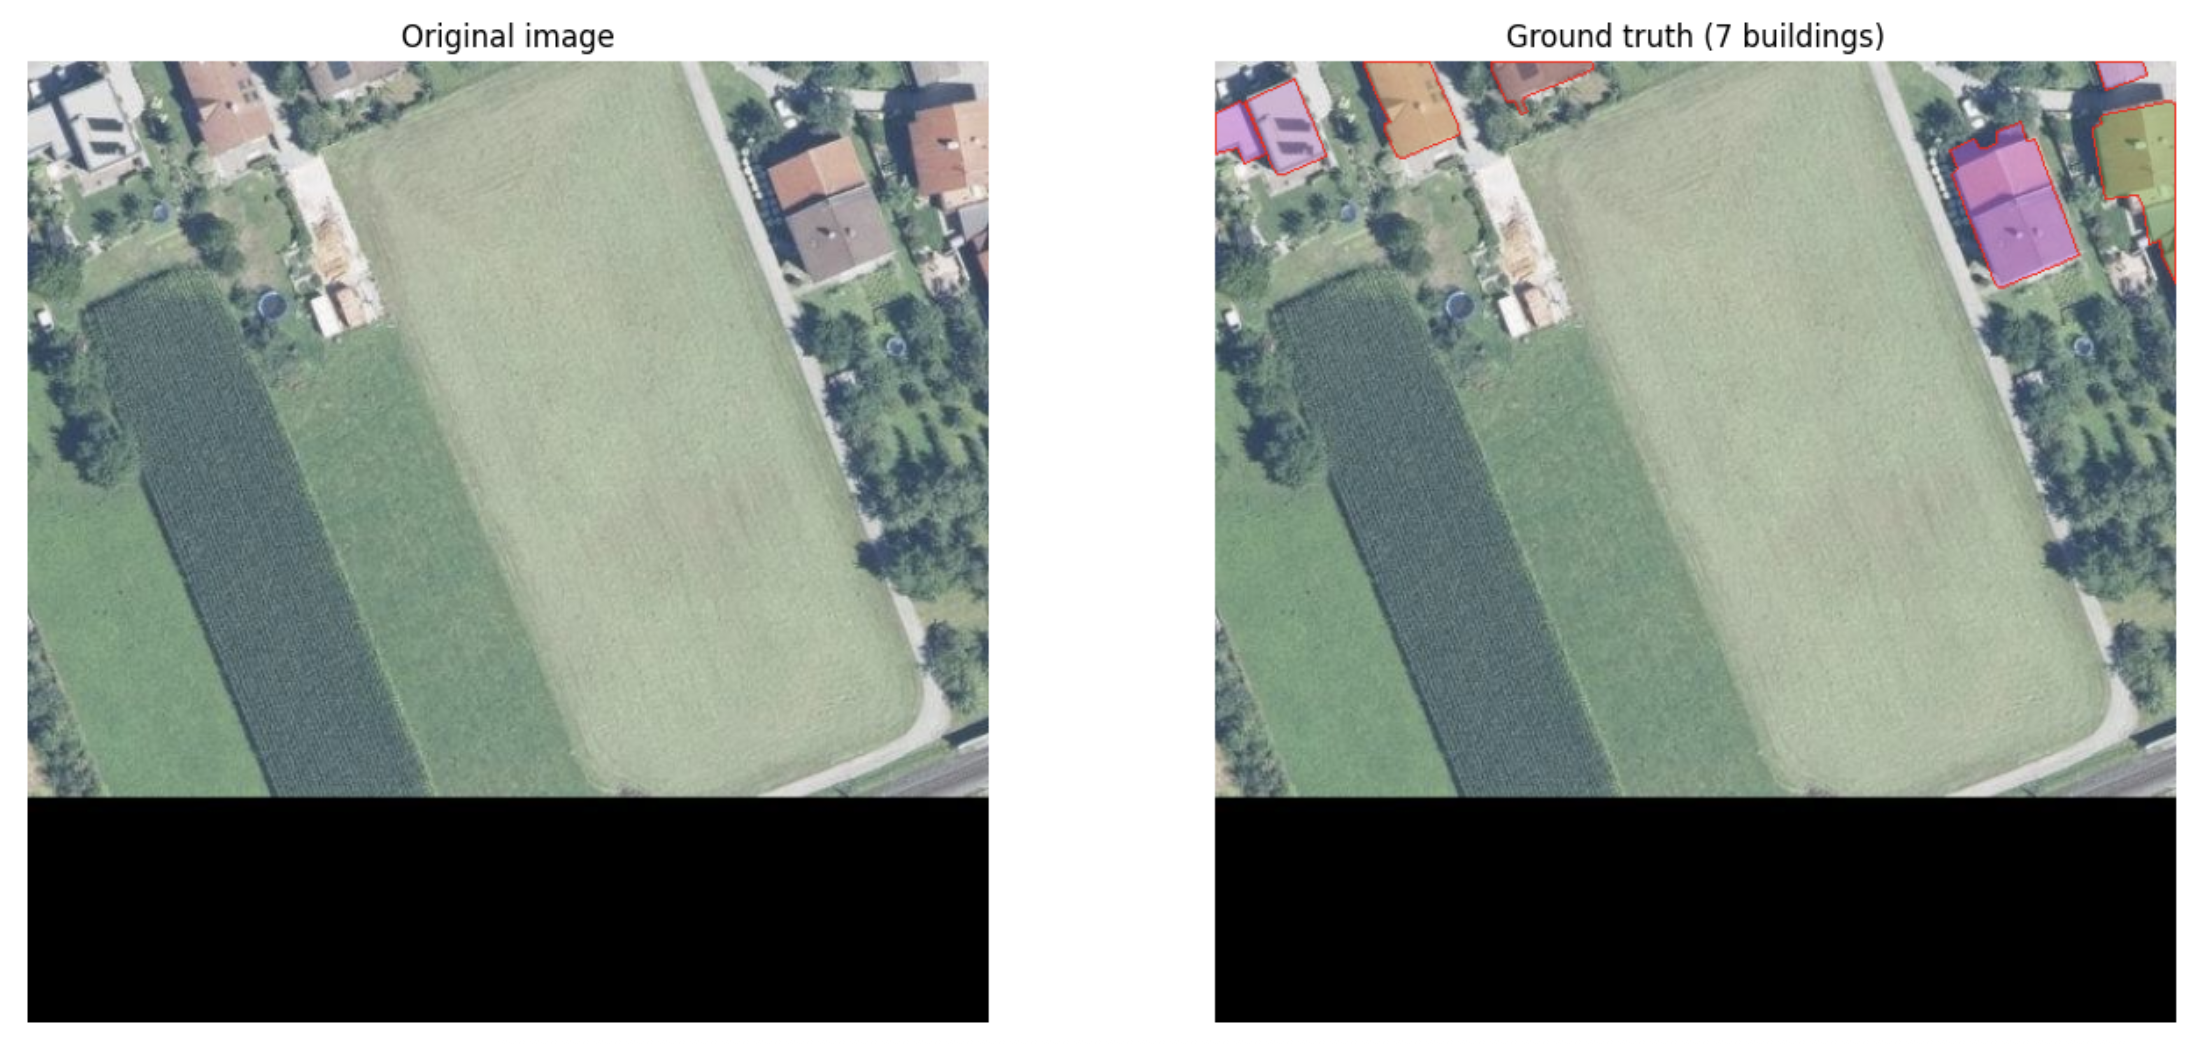
加载模型和图像处理器
使用 AutoImageProcessor 和 AutoModelForInstanceSegmentation 加载 RF-DETR-Seg 模型。加载模型时,传入 id2label 和 label2id 映射,以针对单一的 “building” 类别配置分类头。由于预训练模型是在 COCO(91 个类别)上训练的,请设置 ignore_mismatched_sizes=True,以便使用正确的输出数量重新初始化分类头。
图像处理器负责所有预处理工作:在保持宽高比的同时调整图像大小,使用 ImageNet 统计量进行归一化,填充至统一尺寸,并且——对于实例分割而言至关重要——将多边形标注转换为二值掩码,调整这些掩码的大小,并将边界框归一化为模型所期望的 [cx, cy, w, h] 格式,其取值范围为 [0, 1]。
>>> from transformers import AutoImageProcessor, AutoModelForInstanceSegmentation

>>> id2label = {0: "building"}
>>> label2id = {"building": 0}

>>> image_processor = AutoImageProcessor.from_pretrained(MODEL_ID)
>>> model = AutoModelForInstanceSegmentation.from_pretrained(
...     MODEL_ID,
...     id2label=id2label,
...     label2id=label2id,
...     ignore_mismatched_sizes=True,
... )
预处理数据
要对模型进行微调,您必须对数据进行预处理,使其符合模型所期望的格式。当您传入图像和 COCO 格式的标注,并设置 return_segmentation_masks=True 时,RfDetrImageProcessor 会完成所有繁重的工作:
- 将多边形分割栅格化为二值掩码
- 将图像、边界框和掩码调整至模型的输入尺寸
- 使用 ImageNet 的均值/标准差对像素值进行归一化
- 将边界框从
[x, y, w, h]转换为归一化的[cx, cy, w, h] - 将图像填充为统一尺寸,并创建
pixel_mask
该转换函数会根据数据集的 objects 列,重建图像处理器所期望的 COCO 风格标注字典。
使用 with_transform 可以延迟应用预处理(在加载样本时即时处理),从而避免将整个处理后的数据集存储在内存中。
>>> from functools import partial
>>> from typing import Any


>>> def transform_batch(examples: dict[str, Any], image_processor) -> dict[str, Any]:
...     """Convert HF dataset rows into COCO-style dicts and pass to the processor."""
...     images, targets = [], []
...     for image, img_id, objects in zip(
...         examples["image"], examples["image_id"], examples["objects"]
...     ):
...         if not objects["id"]:
...             continue
...         annotations = [
...             {
...                 "id": ann_id,
...                 "image_id": img_id,
...                 "category_id": cat,
...                 "bbox": bbox,
...                 "area": area,
...                 "segmentation": seg,
...                 "iscrowd": crowd,
...             }
...             for ann_id, cat, bbox, area, seg, crowd in zip(
...                 objects["id"],
...                 objects["category"],
...                 objects["bbox"],
...                 objects["area"],
...                 objects["segmentation"],
...                 objects["iscrowd"],
...             )
...         ]
...         images.append(image.convert("RGB"))
...         targets.append({"image_id": img_id, "annotations": annotations})
...
...     if not images:
...         return {}
...     return image_processor(
...         images=images, annotations=targets, return_segmentation_masks=True, return_tensors="pt"
...     )


>>> transform = partial(transform_batch, image_processor=image_processor)
>>> train_ds = train_ds.shuffle(seed=42).with_transform(transform)
>>> valid_ds = valid_ds.with_transform(transform)
验证一个预处理后的示例。它包含 pixel_values(归一化的图像张量)、pixel_mask(指示真实像素与填充像素)以及 labels(一个字典,包含 class_labels、采用归一化中心格式的 boxes 以及二值 masks):
>>> example = train_ds[0]
>>> print(f"pixel_values shape: {example['pixel_values'].shape}")
pixel_values shape: torch.Size([3, 432, 432])
>>> print(f"pixel_mask shape: {example['pixel_mask'].shape}")
pixel_mask shape: torch.Size([432, 432])
>>> print(f"labels keys: {list(example['labels'].keys())}")
labels keys: ['size', 'image_id', 'class_labels', 'boxes', 'area', 'iscrowd', 'orig_size', 'masks']
>>> print(f"  class_labels: {example['labels']['class_labels']}")
  class_labels: tensor([0, 0, 0, 0, 0, 0, 0, 0, 0, 0, 0, 0, 0, 0, 0, 0, 0, 0, 0, 0, 0, 0, 0, 0,
        0, 0])
>>> print(f"  boxes shape: {example['labels']['boxes'].shape}")
  boxes shape: torch.Size([26, 4])
>>> print(f"  masks shape: {example['labels']['masks'].shape}")
  masks shape: torch.Size([26, 432, 432])
数据整理器
由于每张图片包含的对象实例数量不同,标签是变长字典,无法堆叠为单个张量。请定义一个自定义的 collate 函数,正常堆叠 pixel_values 和 pixel_mask,但将 labels 保留为按图片划分的字典列表:
>>> import torch


>>> def collate_fn(batch: list[dict[str, Any]]) -> dict[str, Any]:
...     out = {
...         "pixel_values": torch.stack([x["pixel_values"] for x in batch]),
...         "labels": [x["labels"] for x in batch],
...     }
...     if "pixel_mask" in batch[0]:
...         out["pixel_mask"] = torch.stack([x["pixel_mask"] for x in batch])
...     return out
定义评估指标
为了在训练过程中跟踪分割质量,请在每个评估 epoch 计算基于并集的 平均 IoU。对于每张图像:
- 将所有预测的实例掩码合并为一张二值化的“建筑物”地图(使用
sigmoid > 0.5对每个查询的掩码 logits 进行二值化) - 将所有真实实例掩码合并为单个二值图
- 计算两个地图之间的交并比
RF-DETR-Seg 的查询掩码不受类别分数阈值的门控,因此该指标会忽略类别分数,并直接对各查询的掩码 logits 进行并集运算。未匹配的查询会产生近乎为空的掩码,因此不会污染并集结果。
这给出了一个逐图像的指标,衡量“模型对建筑物的覆盖程度”,并在整个验证集上取平均值。
实例分割基准(例如 COCO)通常报告掩码平均精度均值(mAP),该指标在一系列 IoU 阈值下将每个预测的实例掩码与真值进行比对,因此会奖励正确分离各个对象。此处使用的基于并集的均值 IoU 是一种更简单、更快的替代指标:它衡量的是整体的像素覆盖率,而非单个实例的质量,这使得它便于在训练过程中跟踪进度。若要进行标准的、感知实例的评估,请改为计算掩码 mAP,例如使用
torchmetrics的MeanAveragePrecision(iou_type="segm")。
将此函数作为 compute_metrics 传递给 Trainer,而不是通过子类化 Trainer 来实现。当设置 eval_do_concat_batches=False(在下面的 TrainingArguments 中设置)时,标准评估流程生成的预测和标签会以逐批次输出列表的形式传递给 compute_metrics,因此该指标会复用这些预测,无需对验证集进行第二次前向传播。在模型输出元组中,索引 3 包含 pred_masks:
>>> import torch.nn.functional as F


>>> @torch.no_grad()
... def compute_mean_iou(pred_masks, gt_masks, target_size):
...     """Union-based IoU: merge all instances per image, then compute IoU."""
...     pred_masks = F.interpolate(pred_masks[None], size=target_size, mode="bilinear", align_corners=False)[0]
...     pred_union = (pred_masks.sigmoid() > 0.5).any(dim=0)
...
...     gt_union = gt_masks.any(dim=0).bool()
...
...     intersection = (pred_union & gt_union).sum().float()
...     union = (pred_union | gt_union).sum().float()
...     return (intersection / union.clamp(min=1)).item()


>>> @torch.no_grad()
... def compute_metrics(evaluation_results):
...     predictions, targets = evaluation_results.predictions, evaluation_results.label_ids
...     ious = []
...     for pred_batch, target_batch in zip(predictions, targets):
...         batch_masks = pred_batch[3]
...         for i, gt_label in enumerate(target_batch):
...             gt_masks = torch.as_tensor(gt_label["masks"])
...             if gt_masks.numel() == 0:
...                 continue
...             target_size = gt_masks.shape[-2:]
...             pred_masks = torch.as_tensor(batch_masks[i])
...             ious.append(compute_mean_iou(pred_masks, gt_masks, target_size))
...
...     mean_iou = sum(ious) / len(ious) if ious else 0.0
...     return {"mean_iou": mean_iou}
Trainer 会自动为返回的键添加 eval_ 前缀,因此这会生成下方用于检查点选择的 eval_mean_iou 指标。
训练
在数据、模型和指标准备就绪后,配置训练。关于 TrainingArguments 的几点重要说明:
remove_unused_columns=False:必须设置,因为默认行为会在我们的 transform 运行之前删除列。eval_do_concat_batches=False:实例分割标签是变长字典,无法跨批次进行拼接。同时,这也使预测结果按批次分组,以便compute_metrics将其与对应的标签进行匹配。metric_for_best_model="eval_mean_iou":根据分割质量而非仅损失来选择最佳检查点。fp16=True:混合精度训练可显著加快现代 GPU 上的训练速度。
>>> from transformers import Trainer, TrainingArguments

>>> training_args = TrainingArguments(
...     output_dir="rf-detr-seg-satellite-buildings",
...     num_train_epochs=10,
...     per_device_train_batch_size=16,
...     per_device_eval_batch_size=16,
...     learning_rate=1e-4,
...     weight_decay=1e-4,
...     lr_scheduler_type="cosine",
...     warmup_steps=0.1,
...     fp16=True,
...     dataloader_num_workers=4,
...     eval_strategy="epoch",
...     save_strategy="epoch",
...     save_total_limit=2,
...     load_best_model_at_end=True,
...     metric_for_best_model="eval_mean_iou",
...     greater_is_better=True,
...     remove_unused_columns=False,
...     eval_do_concat_batches=False,
...     push_to_hub=False,
... )

>>> trainer = Trainer(
...     model=model,
...     args=training_args,
...     train_dataset=train_ds,
...     eval_dataset=valid_ds,
...     processing_class=image_processor,
...     data_collator=collate_fn,
...     compute_metrics=compute_metrics,
... )

>>> trainer.train()
如果在训练参数中设置 push_to_hub=True,训练检查点将被推送到 Hugging Face Hub。训练完成后,调用 push_to_hub() 方法将最终模型也推送到 Hub。
>>> trainer.push_to_hub(
...     dataset=DATASET_ID,
...     tags=["instance-segmentation", "rf-detr-seg", "vision", "satellite", "building"],
... )
推理
现在,您已拥有一个经过微调的模型,可以使用它对新的卫星图像进行推理。工作流程如下:
- 使用图像处理器对图像进行预处理
- 通过模型执行一次前向传播
- 使用
post_process_instance_segmentation对输出进行后处理,以获取像素级掩码
后处理步骤将原始查询输出(logits + 低分辨率掩码)转换为全分辨率实例分割图,并应用分数阈值处理和掩码二值化。
>>> from datasets import load_dataset

>>> test_ds = load_dataset(DATASET_ID, split="test")
>>> sample = test_ds[0]
>>> image = sample["image"].convert("RGB")

>>> device = next(model.parameters()).device
>>> inputs = image_processor(images=image, return_tensors="pt").to(device)

>>> with torch.no_grad():
...     outputs = model(**inputs)

>>> results = image_processor.post_process_instance_segmentation(
...     outputs, threshold=0.5, target_sizes=[(image.height, image.width)]
... )[0]

>>> print(f"Detected {len(results['segments_info'])} buildings")
Detected 0 buildings
>>> for seg_info in results["segments_info"][:5]:
...     print(f"  Building (score: {seg_info['score']:.3f})")
可视化预测结果。分割图为每个像素分配一个分割 ID(背景为 -1)。为每个检测到的建筑物叠加一种随机颜色:
>>> fig, axes = plt.subplots(1, 2, figsize=(14, 6))

>>> _ = axes[0].imshow(image)
>>> _ = axes[0].set_title("Input satellite image")
>>> _ = axes[0].axis("off")

>>> seg_map = results["segmentation"].cpu().numpy()
>>> overlay = np.array(image).copy()
>>> for seg_info in results["segments_info"]:
...     mask = seg_map == seg_info["id"]
...     color = np.random.randint(0, 255, 3)
...     overlay[mask] = (overlay[mask] * 0.4 + color * 0.6).astype(np.uint8)

>>> _ = axes[1].imshow(overlay)
>>> _ = axes[1].set_title(f"Predicted masks ({len(results['segments_info'])} buildings)")
>>> _ = axes[1].axis("off")
>>> plt.tight_layout()
>>> plt.show()